Note that the below instructions are for making the ecosystem/biodiversity game (not the hand building game – women in STEM, GSA deck type mechanics).
You like games, and you care about the environment. Why not combine the two and throw in a little design learning in as well? This playlist will introduce you to the Phylo Trading Card Game system, and will get you to create your own cards, or even your own playable game. Along the way, you’ll get to experience some elements of game design, consider some of the nuances around game based learning, and (most of all) you’ll end up learning a lot about the biodiversity topic you’ve chosen to study.
STEP 1: Explore: What exactly is the Phylo Trading Card Game project (30 min)
Phylo started off as a reaction to the fact that: “Kids know more about Pokemon creatures than they do about real creatures.” Basically, it is an example of a crowdsourced project where a trading card game is created, making use of the wonderful, complex, and inspiring things that inform the notion of biodiversity. By crowdsourced, we mean that it is a game that is continually expanding and evolving because of the participation and contribution of creators like yourself. This project has grown because of the efforts of thousands of participants over the years to result in multiple game decks and hundreds of freely available cards.
If you’re really craving a more detailed origin story, do check out this petcha kucha video where Dr. Dave Ng, one of the project’s founders, describes the process (https://vimeo.com/120075917).
STEP 2: Explore: What is game-based learning? (10 min)
Game-based learning is simply where pedagogy (which is a formal term for “the practice of teaching”) has been included in the act of using a game. The general idea is that since games encourage play, the student can reap some educational benefits, such as being more engaged in the subject matter. Of late, many educators have looked to using games as tools in learning especially since digital games, and even analog games (such as card and board games), continue to surge in popularity. Note that this is not quite the same as the term “gamification.” This term is much broader, often seen in the business community, and includes the use of games towards achieving goals in general (i.e. this can include using games to solve a problem, increase productivity, or enhance visibility/immersion).
To kind of get in the zone, can you think of two examples of game-based learning that you have done in your own classes? Can you think of two games (digital or analog) that you have played that also tied into science themes?
STEP 3: Explore: Checking out the Phylo website, downloading a pdf starter deck (30 min)
Now it’s time to get a better sense of the Phylo Trading Card Game. Here, we, encourage you to check out this website more, especially the section that highlights the cards [http://phylogame.org/cards] , as well as the many decks already available [http://phylogame.org/decks/].
In fact, go to the Card section and see if you can find a Phylo card of an animal or plant that you have seen in real life. Which card did you pick?
Now, go to the “deck”section, and take a look at some of the decks already available. Note that some are “starter” decks, and some are “expansion” packs. We’ll be focusing on the ones that revolve around ecosystem. In this deck section, you will download the Beaty Biodiversity Museum starter deck [direct link]. Print it out and cut out the cards so that you’re ready for the next step*. Take a picture of this deck and post on the site!
STEP 4: Explore: Playing the Phylo Trading Card game. (1 hour)
In this section, we’re going to learn how to play the game. Don’t forget to have your printed-out deck ready. Take a look at the instructional video (see below), as it will give you a basic breakdown of how to play this game. There’s also full text instructions at http://phylogame.org/game-play/ (we’ll be playing the “ecosystem game”).
Don’t forget that sometimes, it takes playing the game a few times to fully understand the rules. As well, when you learn, try to play to win – this is actually a really good way to get immersed in the game!
As you play, can you think about ways that the game rules actually showcase basic science concepts (especially ones related to ecosystems and food chains)?
STEP 5: Design: Thinking about the type of phylo deck you want to make. (1 hour)
It’s really good to start this process by thinking a little of what exactly you want your deck to be all about. Doing this will generally help make your deck constructing efforts more efficient, because it gives you specific directions that you can focus on. Here, we suggest having a deck theme that is going to focus on the biodiversity of a very specific location.
This is probably the most common theme that folks are interested in. It is also the most straightforward of deck themes out there, because in many ways, the organisms you choose to research will naturally connect to each other. However, do note that these connections will be easier to figure out, if you (i) focus on a smaller locale – i.e. a specific area, say a park, as oppose to an entire country; and (ii) focus on a more narrow range of habitat (just the forest, or just the ocean) – in other words, having a deck that includes organisms in both water and land habitats will be a little trickier to work out, then just having one or the other (but we’ll get to that later). As a final note, we also suggest the idea of picking a location that happens to be somewhere close by. This way, you get to explore the biodiversity that is literally on your doorstep!
(Note: the above deck theme is going to be the simplest way to go, but if you’re feeling especially ambitious, there are other theme ideas out there. Read this pdf for these other possible ideas, but do note that these tend to take more work to figure out).
Anyway, once you have chosen a deck theme, write down a description of the type of deck you will make as well as some comments on why you chose this theme. Really put some thought into this – it’s your game after all! Note that this can change as you go through the design process.
STEP 6: Design: Research the information needed for a beta Phylo species card (15 min)
Download this pdf. (also shown below)
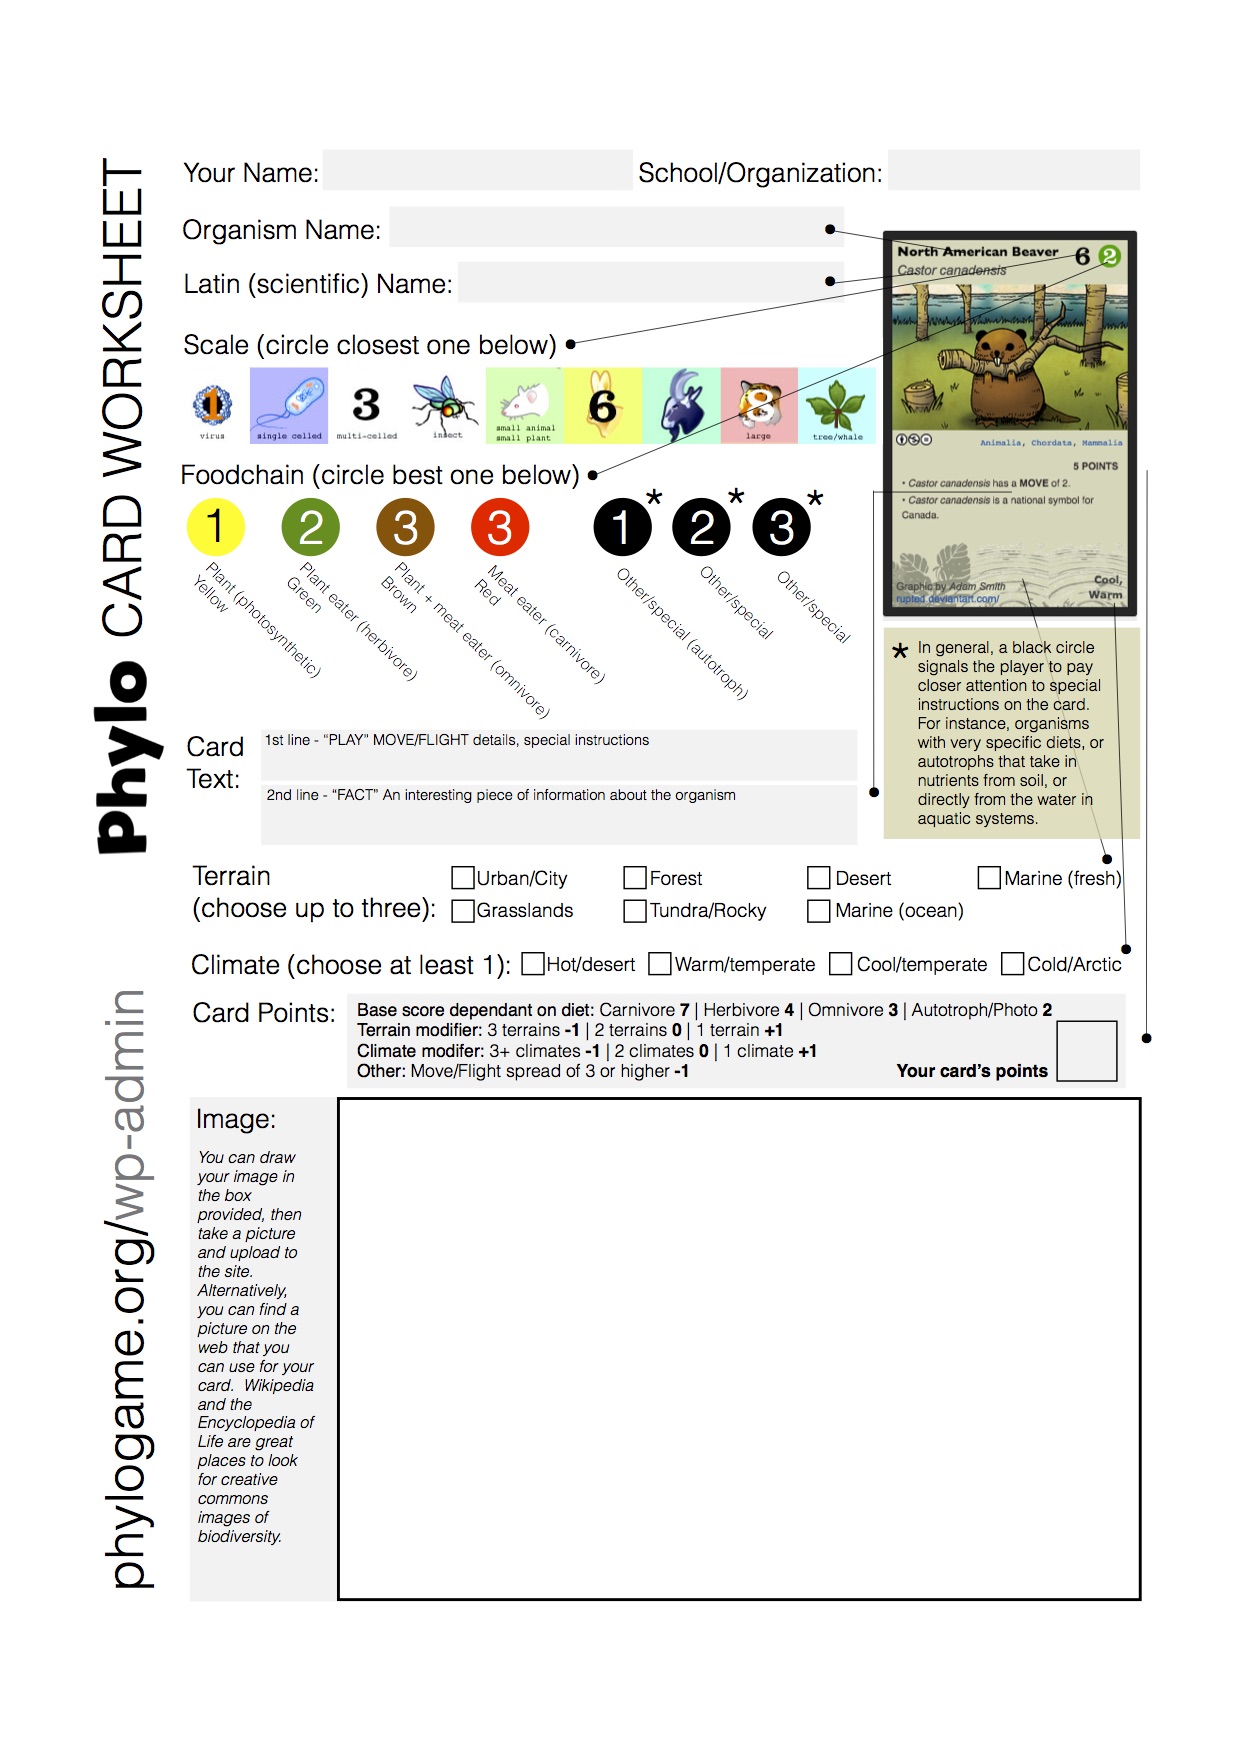
You’ll see that this worksheet will help you figure out what information to put on a species card. Pick an organism that inhabits your chosen location, and do some research to fill in the worksheet. Wikipedia is actually really good for this, but if you get stuck then the Encyclopedia of Life is also great resource. For now, don’t worry about the picture (unless, of course, you really want to draw)!
7: Design: Making a beta list of your full deck of cards (3+ hours)
Once you’ve determined the general theme of your deck, and you’ve had a chance to work through the research necessary to make one card, the next thing you need to think about is full list of cards for the deck. Usually, this starts with making a list of species that make up your particular ecosystem.
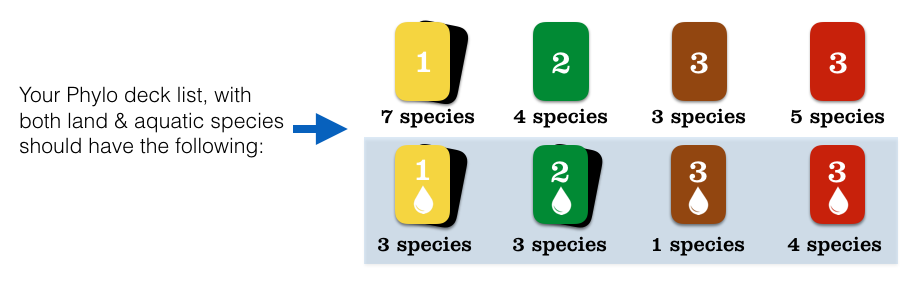
Come up with a list of about 30 or so species for your locale. Since they need to interact with each other and form a food web, you’ll need to make sure they represent a variety of different places in the food web. You can use the below breakdown for the types of species (food web colour and number) you should seek out for this list.

With this list, create a spreadsheet that includes columns that highlights the same information as that seen previously when you used the worksheet for researching your first species. This is the part that takes some research work. It’s basically doing what you did in the previous XP, but for a larger set of species. [here’s an excel template you can use – link]
Excel file will have the following columns:
Name,
Latin Name, Size, Terrain, Climate, Points,
Food Chain requirements (i.e. photosynthetic, herbivore, etc) colour, and number.
Move/Flight Text, Fun Fact Text:
In a previous XP we mentioned that if your deck had both land and aquatic organisms, things will be a little more complex. However, to help work you way through this, you can follow the below breakdown instead.
At the end of this section, you should have a spreadsheet detailing the list of 30 potential species cards (with the data included in their respective columns).
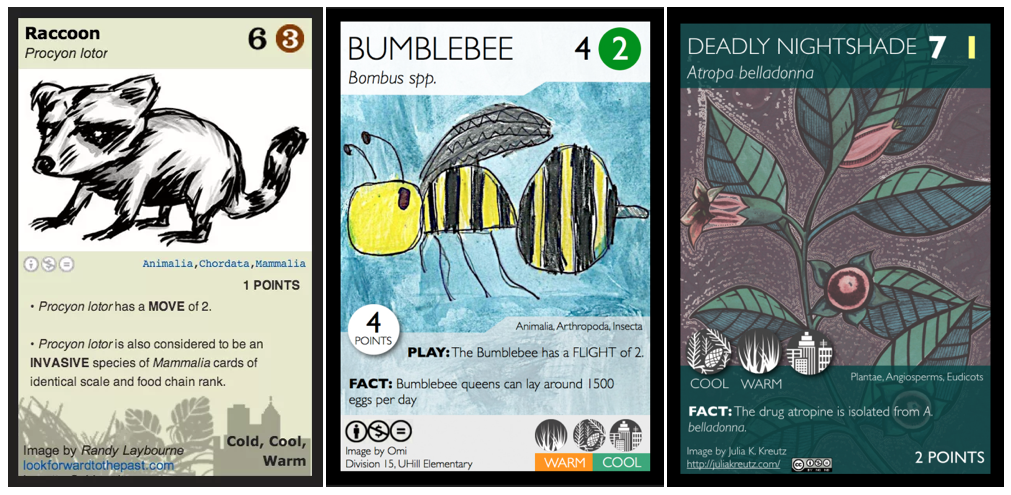
STEP 8. Create: Make your beta deck (species cards first). (1 hour)
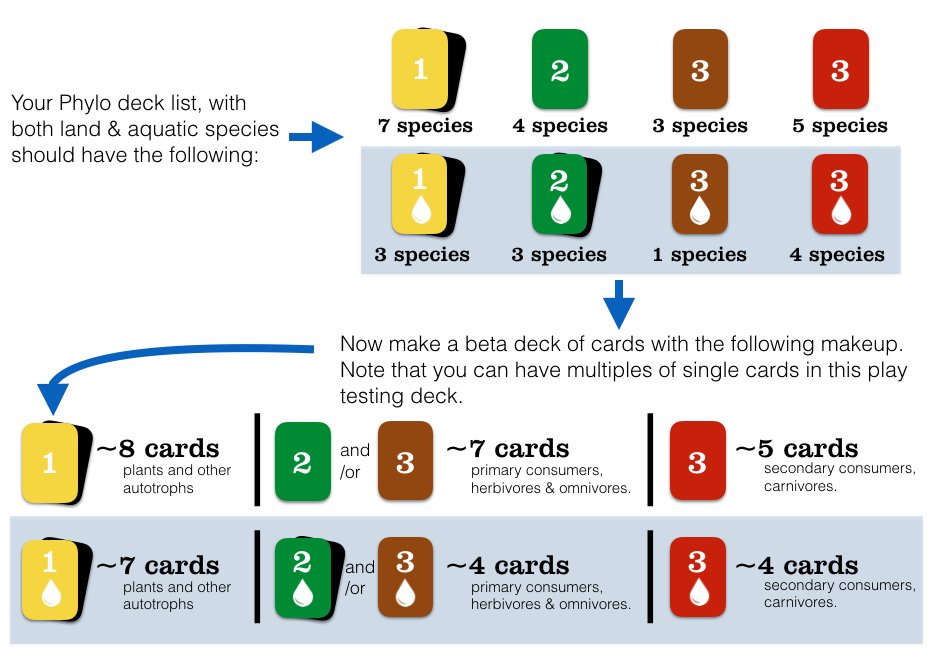
Now that you have your list, next comes the step where you want to make a set of beta (or rough) cards to play with. The final deck will have about 52 cards in total. 2 of these will be the home cards, and the remainder are a mix of your species and event cards. Of the remaining 50 cards, about 35 will be species cards, and 15 will be event cards. This XP will focus on the species cards.
However, because this is still at the early design stage, it’s actually best to make cards which are fairly basic in nature. Using cue cards and felt tip pens works really well, as they allow you to make notes and changes directly on the card. And at this stage, it actually makes most sense to not even bother with the images (you do that once you’re sure that your cards work as a deck – see later XP).
For the composition of these 35 cards, you can continue following the below.

This obviously means that some cards will have duplicates. It might even mean that some of the cards you have in your researched list won’t make the cut.
Again, things are a little more complex if your deck has both land and aquatic species. If so, continue following the below:
STEP 9. Create: Make your beta deck (event cards). (1 hours)
After the species cards are done, you’ll need to think of “event cards” next. A deck needs about 15 total of these cards. If you recall from the game, these are cards that highlight environmental situations. Whether these cards are negative or positive (hurt or help food chains) will depend on the theme of your deck. However, most currently available decks tend to have about three quarters being negative, one quarter positive, and perhaps 1 card that is an intentionally more powerful (negative or positive) card.
The Beaty deck that you printed out earlier provides a good example of what these event cards might look like:
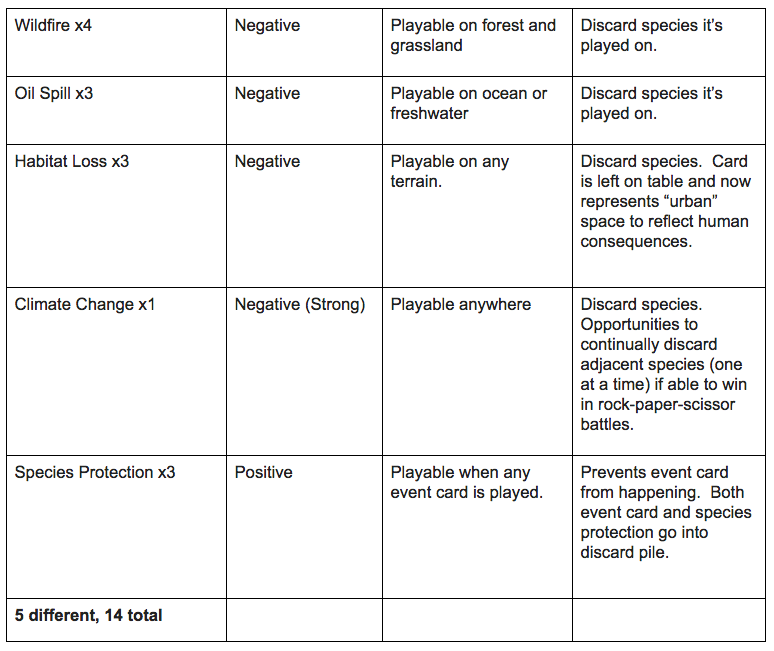
Once you have thought about what your event cards will be, you can make cue cards for them as well. Here, it’s very important that the language on the card is super clear so that players know exactly how they are used in the game, and what happens when they are used in the game. Also add these to your excel spreadsheet.
STEP 10: Participate: playtest, playtest, playtest. (2+ hours)
The reality with game design is that one of the most important steps is play-testing. This is where you just play the game over and over again to see if you can find any problems with the game in its current state. In the case of a Phylo deck, this includes minor things like grammatical errors, but can also include major things like finding out that: (1) certain cards are unplayable, or really difficult to play (i.e. because there are not enough other cards to set up an appropriate food chain set-up); (2) certain cards give a player an unfair advantage (i.e. a card that is too powerful or the points don’t make sense); or (3) there are certain “moves” that a player can make to ensure winning. A lot of these problems won’t become apparent unless you just test the beta deck out over and over again. So find a friend, and play a game (or two or ten)! ANd remember, really play to win – this is where you’re really trying to see if you can “game” the system.
At this point, it’s useful to write a short (<300 word) summary of some of the problems you found with your beta deck.
STEP 11. Reiterate: Editing your beta deck. (2+ hour)
Reiteration is a common engineering term, basically meaning that you often need to do things over and over again, and tweaking things along the way, before you get to your final product. Any issues you find from your playtesting will need some work and will result in edits in your deck card list or directly on your cue cards (you may even need to eliminate or add on cards). And from here, it’s back to play testing all over again.
In general, for the purposes of this process, the thoroughness of how often you do this “play-test + reiterate” cycle is really dependent on how polished you want the deck to be. Or for example, is it being offered to public (i.e. representing an organization or one that will be purchasable down the road). In general, if you really want to make this game something that others can use, it’s worth going through this cycle at least 3 times (if not more)!
In any event, when you’re done reiterating, update your final spreadsheet highlighting your final cards and the information that will be on them. Congratulations, you have designed a Phylo card game!
Here, a debrief is often useful – write 300 words sharing your experience with this playlist. As you do this, consider the following questions: Do you think games are an appropriate resource for education? Did you find the game design especially interesting? Do you think your efforts to do a good job in designing your game motivated you in learning the biodiversity of your ecosystem? What do you think of your game? Is it good enough to be shared with educators or illustrators for wider use?
STEP 12: Create: make polished penultimate/final copy (optional)
Some of you may wish to get your card game to a final state whereby you also make it look professional. Here, the focus is largely on figuring out how to make your cards looks aesthetically professional, as well as deciding upon a means of distribution.
With the game design work largely done, you can now focus on the graphic design side of things. There’s two main things you need to consider here.
1. You’ll need to get pictures for your cards! There’s number of different ways you can do this, depending on how much time you have, and whether you have access to resources and funds.
One way, of course, if to supply the art yourself. This would be a major undertaking, but if you’re an artist then this is a wonderful option. Alternatively, you may be able to get your friends or classroom to participate or help out!
There are also some ways to get free images that may work nicely with your game deck. One option is to browse through creative commons versions of photographs (specifically ones that are sharable). If you go this route, do familiarize yourself with some of the terminology around creative commons, as you want to make sure you respect the wishes of the person who originally posted the photograph (i.e. is it non-derivative, non-commercial, requires attribution, etc). Good places to find such photographs are wikipedia, as well as Flickr (you can set search parameters to include creative commons licenses).
[link] to wikipedia
[link] to Flickr
Another option is to use vintage historical art. In essence, a lot of these beautiful images are now in public domain because they are older than 100 years (or less, depending on the country you are working from). A great resource to browse through this option is the Biodiversity Heritage Library. They have an amazing Flickr page that is worth checking out! This is definitely a great option, although note that some imagery still has copyright placed on them. If you want to play it safe, you can make sure that your game is non-commercial (not made to make money).
[link] to Biodiversity Heritage Library Flickr page.
If you go the route of finding artists to produce the art for you, we strongly recommend compensating artists at an agreed upon and reasonable rate. In our view, obtaining art via competition formats or pro bono requests (except in special circumstances) will breach graphic design code of ethics – in essence, artists should be treated as professionals, and as such should be compensated appropriately for their work. We happen to have a template for a contract if you need one.
Phylo Art Commission Contract Template – notes in red (doc | docx | pdf)
2. You’ll want to think about how you can organize the information needed on the cards. In other words, what is the layout for your cards. For this element, it’s usually best to look at existing cards to see what others have done, but it’s also fine to come up with your own layout. Below are some images of card layouts used in some previous decks.
The Phylo project actually has a number of card templates ready to use (in either powerpoint or keynote formats), where you can create your cards by simply exporting a slideshow of your cards (after text editing, and inserting the image) in a graphic format (usually PNG is best). In case you’d like to actually make a high quality printed version of your deck, these slide formats have been created to produce an image of your cards at 825 x 1125 pixels, as this is a common resolution requirement for card printing services. Note that we have also provided a file for the card backs (see below).
[link] to powerpoint card template
[link] to keynote card template
[link] to card back file
For professional card printing services, you can use a local print shop, or we recommend using one of the following online printing services*:
www.gamecrafter.com – allows you to create a mini online shop where your deck can be printed in real time (i.e. when someone actually wants to purchase a deck).
Makeplayingcards.com – is a more traditional card printing shop. One of the cheapest options, especially if you order in bulk.
*Note depending on distribution options, smaller hosts may want to rely on real time game publishing options which whilst print decks at a higher overhead cost, provide purchasing options with little administrative oversight. Meanwhile, larger host organizations may prefer to rely on conventional printing options, which are cheaper (per deck), but usually require large orders and independent distribution methods (i.e. you have your own gift shop, online shop, or plan to just give away as swag, etc). Please be aware that options for real time publishing are usually geographically limiting, meaning that taxation nuances (if revenue is being collected) can be complicated (i.e. if you’re based in Canada and are using a US printing service, non-resident revenue claims can be high maintenance).